DNS [CNAME] AND SMTP SETUPS
HOW TO SET UP YOUR CNAME
A CNAME record (or Canonical Name) allows you to create a subdomain/host that will act as an alias for another host set up to answer for your domain.
Each hosting service has slightly different ways to create CNAME records. Guidelines are provided here for some of the common services. When in doubt, Go with ADJO REVBOOSTER Kickstarter package where our expert will take care of all these settings and configuration.
Keep in mind that changes to DNS records may take up to 48 hours to take effect
TIP: If you have a corporate network with internal DNS, your network administrator will also need to add similar entries on your internal DNS server so the links work inside your network too!
GoDaddy.com
1. Log in to your account at www.godaddy.com
2. Click the domain name that you'd like to use with your links
3. Click the DNS Zone File tab
4. Click Add Record
5. From the Record type list, select CNAME (Alias)
6. Complete the following fields:
A. Host: Enter the subdomain name for the alias assignment. Be sure to only enter the subdomain of the address you want to use for your links, not the full address. For example, if you picked links.mydomain.com as your address, only enter ‘links’ here, not links.mydomain.com
B. Points to: Enter funnels.msgsndr.com as the Host Name
C. TTL: Select how long the server should cache the information; or use the default setting of 1 hour
7. Click Finish, then click Save Changes
1and1
1. Log in to your account at https://admin.1and1.com, select the relevant package
2. Click Manager Domains from the Domains panel
3. Locate the domain that contains the subdomain you want to modify and then click Manage Subdomains
4. From the drop-down menu, select Create Subdomain. (If you've already created a subdomain for your links address, skip to step six)
5. Enter only the subdomain you want to use and click OK. For example, if you chose links.mydomain.com for your links address, you should enter links here
6. Select the checkbox next to the subdomain that you will be using. (Example: links.mydomain.com)
7. From the DNS menu, select Edit DNS Settings
8. Click the radio button next to CNAME
9. Enter funnels.msgsndr.com as Points To value
10. Click OK
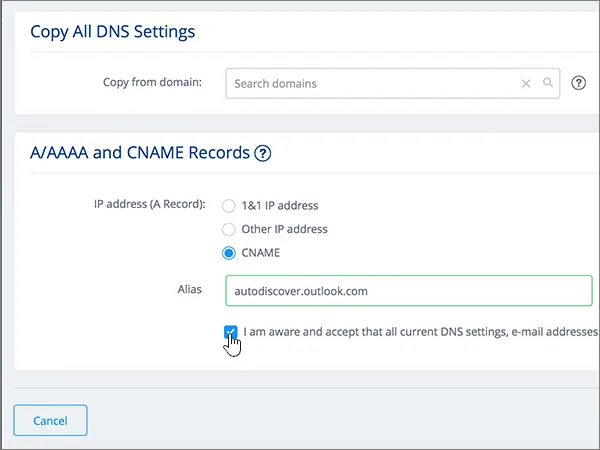
CloudFlare
1. From within your Cloudflare account, click on the domain you wish to connect with ADJO
2. Along the top menu, select "DNS"
3. Under DNS Records and towards the top, click "Add record"
4. Select CNAME from the dropdown
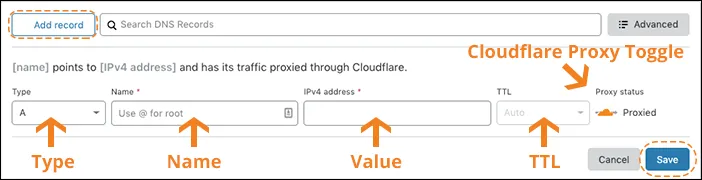
5. Enter "Subdomain" as the Name* (you would put your subdomain in here)
6. Enter funnels.msgsndr.com as the Target
7. Click "Save"
CloudFlare
1. From within your Cloudflare account, click on the domain you wish to connect with ADJO
2. Along the top menu, select "DNS"
3. Under DNS Records and towards the top, click "Add record"
4. Select CNAME from the dropdown
5. Enter "Subdomain" as the Name* (you would put your subdomain in here)
6. Enter funnels.msgsndr.com as the Target
7. Click "Save"
Setting Up SMTP Providers
Please Note:
Your SMTP provider may have daily limits on how many emails can be sent. Gmail, for example, has a limit of approximately 100-150 emails per day when connected to the server from a remote email client.
A List of SMTP and IMAP Server
Setting Up SMTP Providers
Please Note:
Your SMTP provider may have daily limits on how many emails can be sent. Gmail, for example, has a limit of approximately 100-150 emails per day when connected to the server from a remote email client.
A List of SMTP and IMAP Server
1. From within your ADJO account, click on the settings(sidebar)
2. Then navigate to SMTP and MailGun Service tab
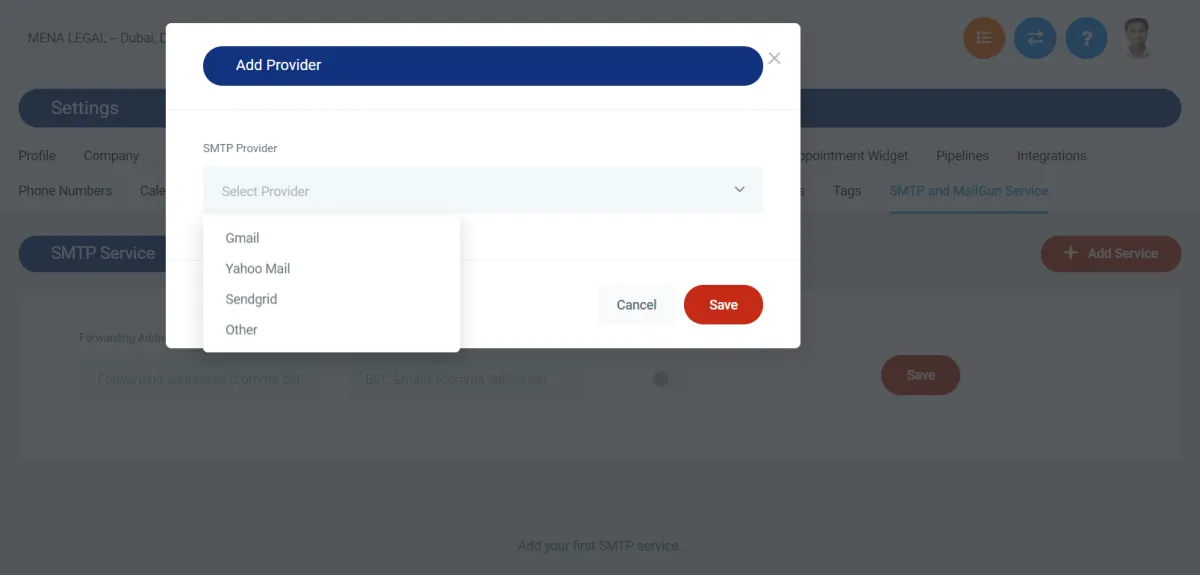
3. Click the + Add Service button
4. From the drop-down menu of SMTP Provider, there will be a list of service providers where you can connect with any of your choice by providing the details of SMTP server, Port number, Username, Email and Password.
1. From within your ADJO account, click on the settings(sidebar)
2. Then navigate to SMTP and MailGun Service tab
3. Click the + Add Service button
4. From the drop-down menu of SMTP Provider, there will be a list of service providers where you can connect with any of your choice by providing the details of SMTP server, Port number, Username, Email and Password.
SALES TOOL EXPLAINER
Timestamps
Dashboard - 0:30
Conversations - 0:47
Opportunities - 1:00
Marketing - 1:08
Reporting - 1:17
Scheduling - 1:30
Reputation - 1:38
Contacts: 1:45
Funnels and Websites - 1:52
This is not your ordinary CRM. Adjo Revbooster Sales Suite is designed ONLY FOR SALES! This video will show you and overview of the sales tool including all the modules and functions.

- Keynote Speaker at Funnel Hacking Live, 2018
- Forbes 40 Under 40 in Business & Marketing, 2018
- Sold a company I ran for 7 years for $1.5b, 2018
- Launched The Rocket Accelerator, 2017
- Joined Russell Brunson's Inner Circle, 2017
- Selected for the ClickFunnel's Design-A-Thon, 2017
The decision is now.
Copyright 2020 ADJO ™. All rights reserved.